Your first server
At the end of this tutorial you have a Minecraft Bedrock Dedicated Server (BDS) with LeviLamina, the loader that runs mods, in a folder of its own on your computer. You install it, start it, send it a command and stop it, all in the interface of lip, the LeviMC package installer. You type no command but lip itself.
It takes about ten minutes, most of it waiting for downloads.
What you need
- A computer with Windows 10, Windows 11 or Windows Server 2019 or later. Linux on x64 and macOS work too:
lipruns the Windows server there through Wine, which it installs by itself. - A terminal: Windows Terminal or PowerShell on Windows. It should be at least 80 columns wide.
- An internet connection.
lipdownloads the game from minecraft.net, and LeviLamina from GitHub.
You do not need to install anything else first: no .NET, no Git, no Visual C++ runtime. lip installs what the server needs.
1. Install lip
lip 0.41 is in pre-release
This tutorial uses lip 0.41 (the interface, the MSI installer, lip setup and lip run). Until 0.41.0 is final, the "latest release" is still 0.40: download the newest v0.41.0-… pre-release from lip's releases instead.
-
Open the latest release of lip and download
lip-<version>-win-x64.msi. On a PC with an ARM processor, takelip-<version>-win-arm64.msi. -
Run the file. The installer asks for the folder to install
lipin,C:\Program Files\lipunless you change it, and installs once you click Install and allow Windows to make changes. It adds that folder to thePATH. -
Open a new terminal window. A terminal that was open before does not know the new
PATHyet. -
Ask
lipfor its version:shelllip -vYou should see a version number, such as
0.41.0. If the terminal says it does not knowlip, close it and open a new one.
On Linux or macOS: the portable archive
Download the archive for your system from the latest release (lip-<version>-linux-x64.tar.xz, lip-<version>-osx-arm64.zip or lip-<version>-osx-x64.zip) and extract it into a folder on your PATH:
mkdir -p ~/.local/bin
tar -xJf lip-<version>-linux-x64.tar.xz -C ~/.local/bin       # Linux
unzip lip-<version>-osx-arm64.zip -d ~/.local/bin             # macOS
If ~/.local/bin is not on your PATH, add export PATH="$HOME/.local/bin:$PATH" to ~/.profile (Linux) or ~/.zshrc (macOS) and open a new terminal. If macOS refuses to run the file, remove its quarantine mark with xattr -d com.apple.quarantine ~/.local/bin/lip. Then check lip -v as above.
2. Start lip
-
Make a folder to keep your servers in, go into it, and start
lip. This tutorial usesD:\servers:Windowsmkdir D:\servers cd D:\servers lipLinux and macOSmkdir -p ~/servers cd ~/servers lip -
You should see the Home page of
lip: a sidebar at the left, an overview that says the folder holds no game yet, and three Next steps, of which Create a server is selected.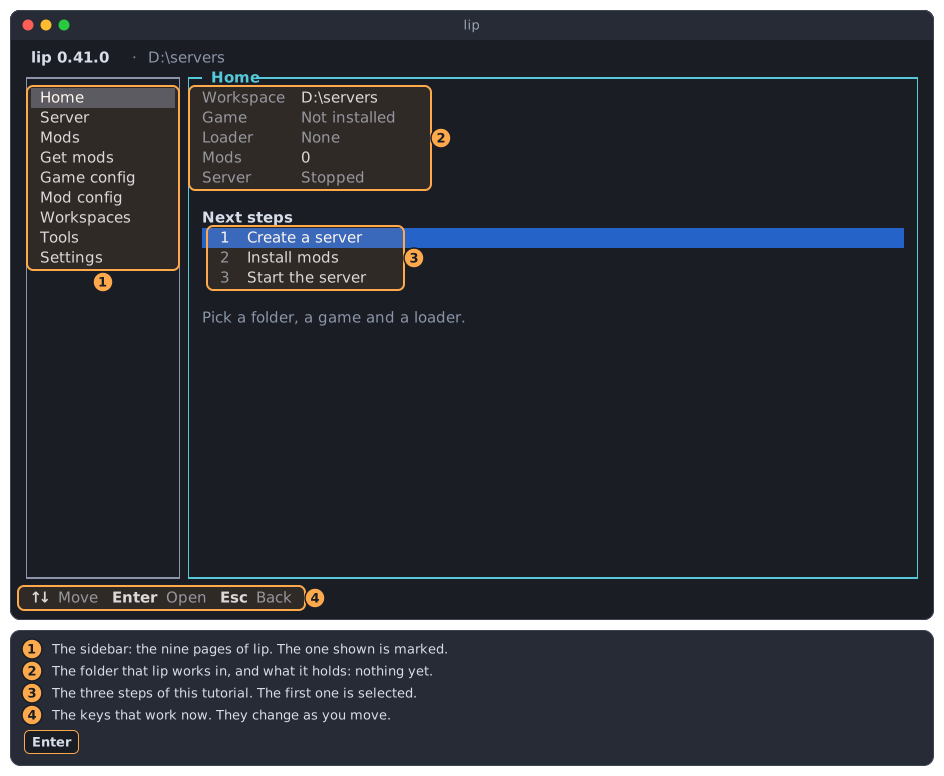
You need only a few keys:
↑and↓move,Enteropens or confirms,Escgoes back. The bottom line always lists the keys that work right now.
lip says "GitHub unreachable"
LeviLamina comes from GitHub. If lip cannot reach it, it asks what to do. Choose Use a proxy if you have the address of a GitHub proxy, Connect directly if your network does reach GitHub after all, or Later to be asked again next time. Without a way to GitHub, lip cannot download LeviLamina. You can change the answer on the Settings page.
3. Create the server
-
With Create a server selected, press
Enter.lipasks where the server goes. Each server needs a folder of its own, so choose Another folder… (↓, thenEnter). -
The folder browser opens at
D:\servers. PressTabto reach the buttons,→to reach New folder…, andEnter. Typesurvivaland pressEnter.lipcreatesD:\servers\survivaland takes it as the folder of the server. -
Choose the Game version. The newest version is at the top. Select the newest one marked LeviLamina ✓ (versions marked No LeviLamina cannot run mods) and press
Enter.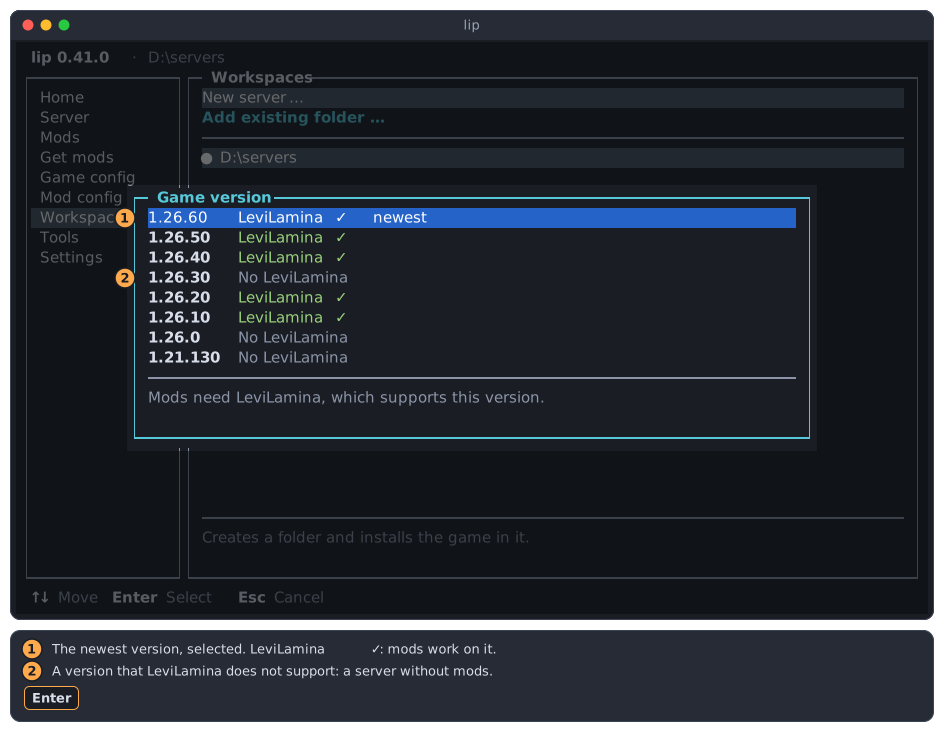
On Linux,
lipthen asks for the Build: choose windows, the only one that runs LeviLamina. -
Choose the Loader: keep the newest LeviLamina and press
Enter. -
lipshows its plan before it changes anything: lines starting withDry run:say that it would install the game (bds) and LeviLamina. PressEnteron Apply.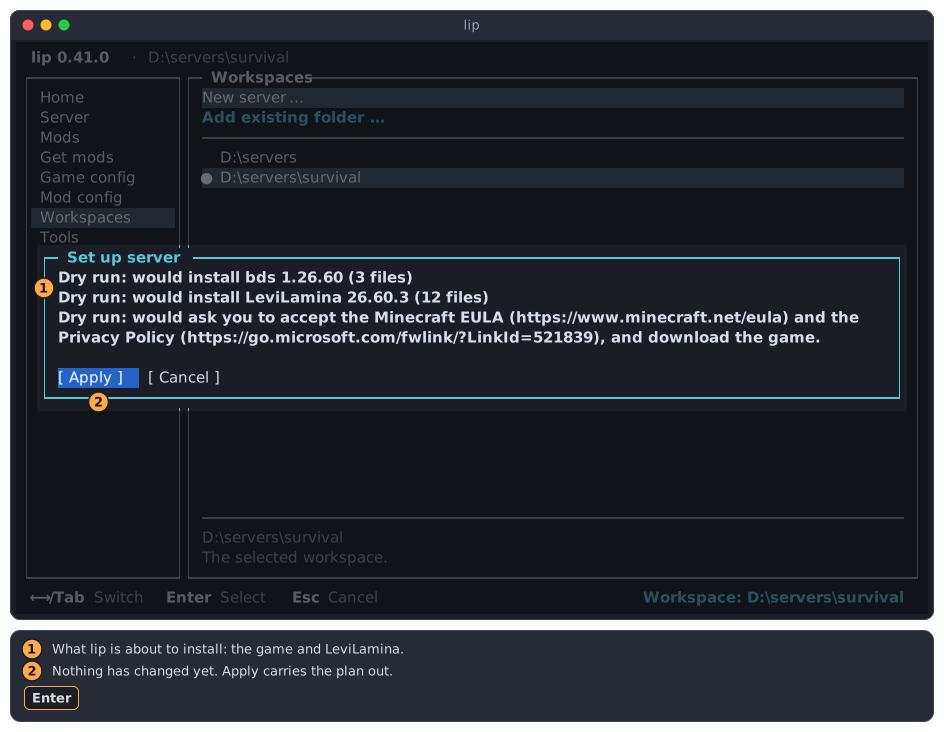
-
Read the Minecraft End User License Agreement and the Microsoft Privacy Policy at the addresses shown. To accept them, press
Enteron Accept. If you decline, nothing is installed. -
Wait while
lipdownloads and installs. The first time, it may also install the Microsoft Visual C++ Redistributable (Windows asks you to allow it), or Wine on Linux and macOS. -
You should see ✓ Done. Press
Enter. You are now on the Workspaces page, andD:\servers\survivalis in the list with a ●: it is the folder thatlipworks in now.
4. Start the server
-
Go back to Home: press
Escto move to the sidebar,↑until Home is highlighted, andEnter. The overview now names the game and LeviLamina, and Create a server has a tick. -
Install mods is selected. Skip it for now: press
↓to select Start the server, thenEnter. -
lipstarts the server and shows the Server page. Wait for the lineServer started.in the output. The lines marked[LeviLamina]show that the loader is running.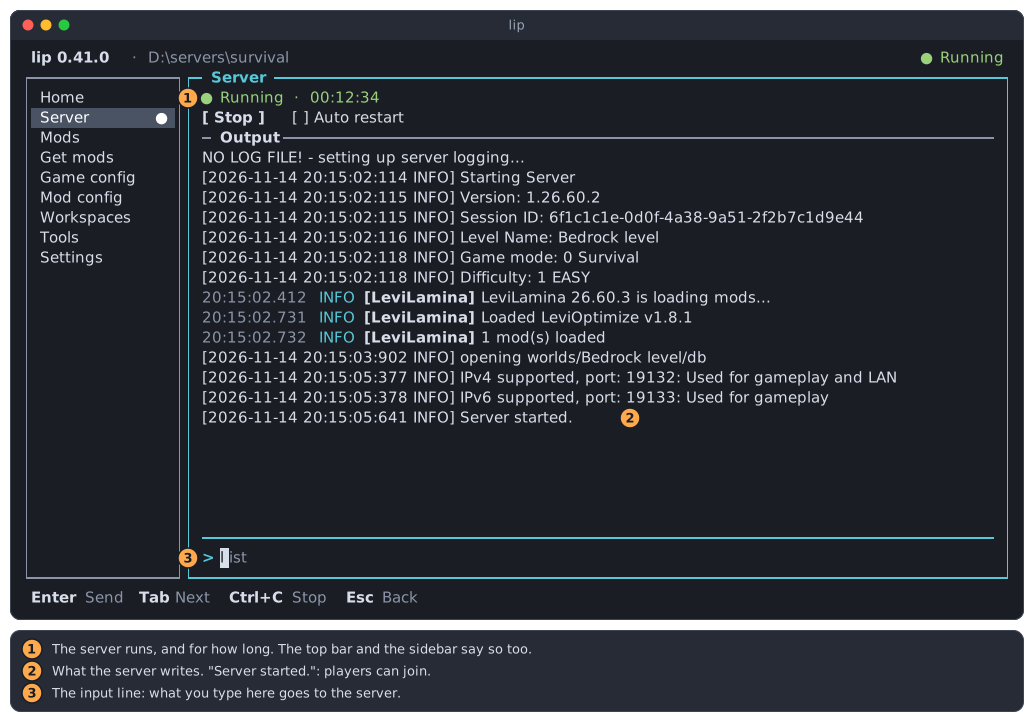
On Windows, the firewall may ask whether to allow the server on your network. Allow it on private networks if you want other devices to join; see Let friends join your server.
-
Send the server a command: type
listin the input line at the bottom and pressEnter. You should see the answerThere are 0/10 players online:. Server commands are typed here without the leading/.
To play on it from Minecraft on the same PC, add a server with the address 127.0.0.1 and the port 19132.
5. Stop the server
- Press
Ctrl+Con the Server page.lipsends the server itsstopcommand and waits until the world is saved. - You should see Exited with code 0 in the first line: the server ended normally. The Start button starts it again.
- To leave
lip, pressEscuntil you are in the sidebar,Esconce more, and confirm Quit.
Next time, start lip in D:\servers\survival (or in any folder: your server is listed on the Workspaces page).
What you have now
- The folder
D:\servers\survival, which holds the game and LeviLamina. It is an ordinary folder: you can back it up or move it. - A server you start and stop on the Server page of
lip.
Stop the server before you change it
While the server runs, lip does not install, update or remove anything in its folder, and does not save server.properties, the allowlist or the permissions.
Next steps
- Add mods to the server: Install mods on your server.
- Let other players connect: Let friends join your server.
- Do the same with commands, for scripts and remote machines: A server from the command line.
- Change the server name, game mode or number of players: Game config.
- Restart the server by itself after a crash: Server.
- Add a second server, or change the game version: Workspaces.
- Learn every page of the interface: A tour of the interface.
- How
lipruns the Windows server on Linux and macOS: Linux and macOS. - Something went wrong: lip troubleshooting and LeviLamina troubleshooting.