Your first LeviLamina mod
At the end of this tutorial you have a LeviLamina mod of your own, written in C++: a repository created from the official mod template, built on your PC, and loaded by your server. The mod writes a line to the server console when it starts and adds a /hello command that greets whoever runs it.
It takes about an hour the first time, most of it installing tools and waiting for the first build to download LeviLamina.
What you need
- A Windows 10 or 11 PC (x64). Mods are built with Windows tools.
- Basic C++. If you are new to it, cppreference.com and the C++ Developer Roadmap are good starting points.
- A GitHub account, to create your repository from the template.
- A server with LeviLamina to test on: Your first server. This tutorial uses
D:\servers\survival.
1. Install the tools
Install these, keeping the default options:
- Git.
- Visual Studio (the free Community edition is enough). In the installer, tick the workload Desktop development with C++: it brings the Windows SDK and the C++ libraries.
- LLVM, the
LLVM-<version>-win64.exeinstaller. When it asks, add LLVM to thePATH. The template compiles withclang-clfrom LLVM. - xmake, the build tool of LeviLamina mods.
- Optional, for editing: Visual Studio Code with the extensions C/C++, XMake and clangd.
Open a new terminal and check that the tools are found:
git --version
clang-cl --version
xmake --version
You should see three version numbers. If one says the command is not recognized, reinstall it and let it add itself to the PATH, then open a new terminal again.
2. Create your repository from the template
-
Open LiteLDev/levilamina-mod-template and press Use this template → Create a new repository. Name it, for example
my-mod, and make it public if you want to publish it later.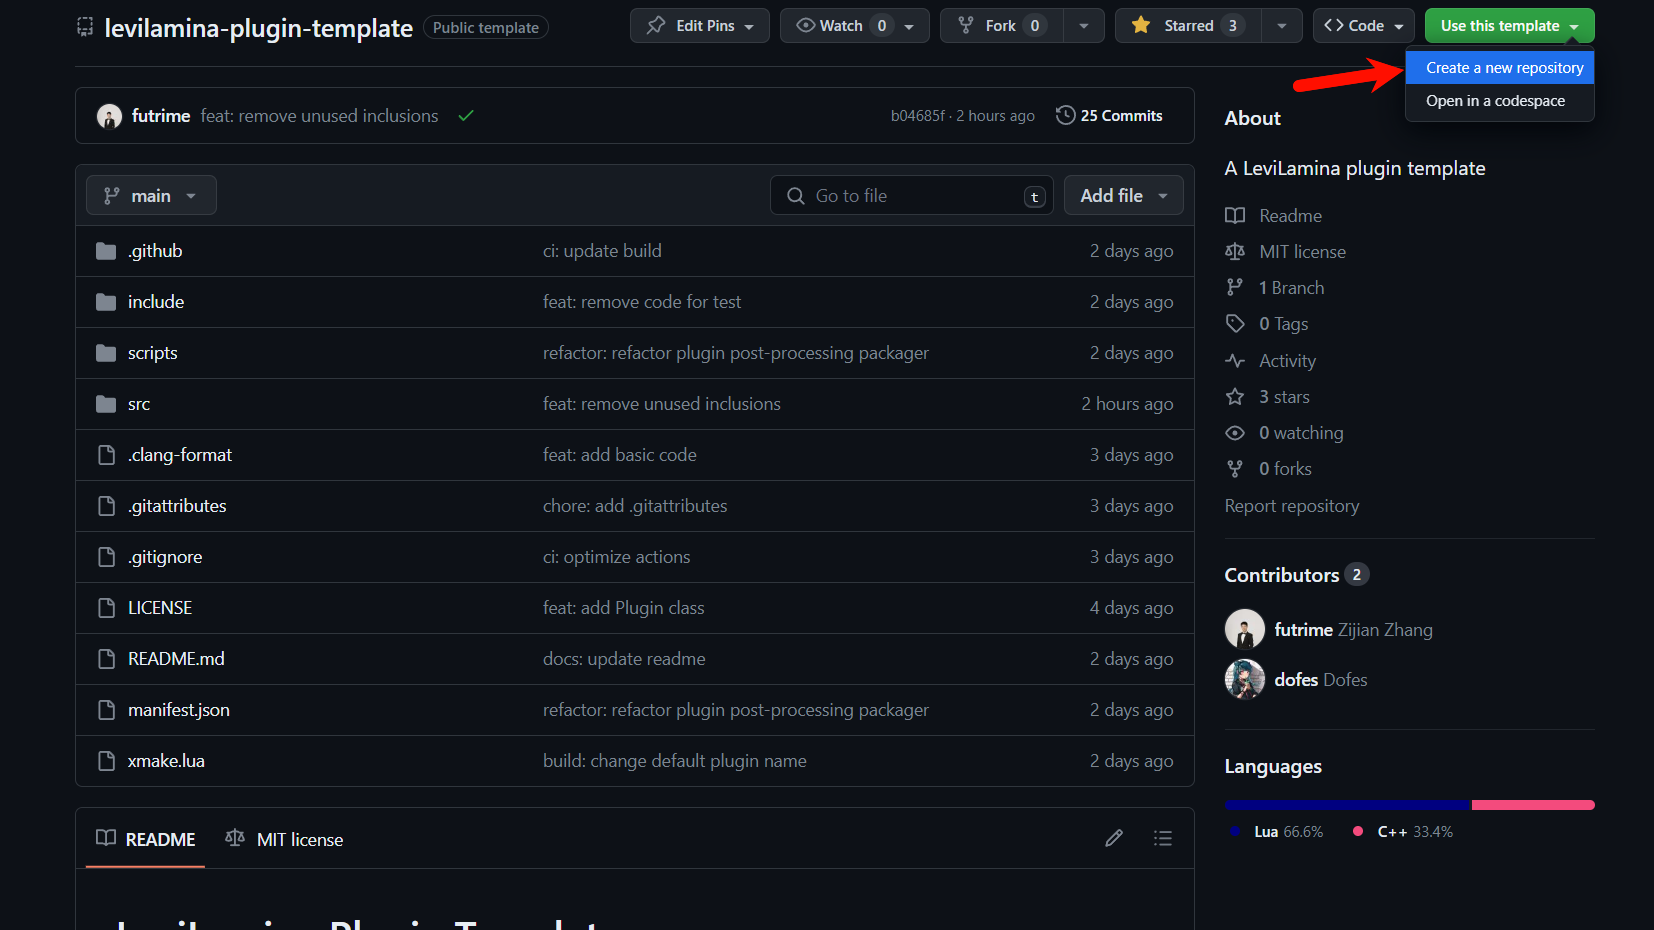
-
Clone it into a folder for your projects:
powershellmkdir D:\projects cd D:\projects git clone https://github.com/<you>/my-mod cd my-mod -
You should see, among others,
xmake.lua,lip.toml,manifest.jsonand the foldersrc\mod\withMyMod.cppandMyMod.h.
3. Name your mod
-
Open
xmake.lua. Thetargetis the name of your mod: LeviLamina shows it, and it names the folder of the mod. Use letters, digits and-, no spaces:luatarget("my-mod") -- Change this to your mod name.This tutorial keeps
my-mod. -
In the same file, pin the LeviLamina version you build against. It must have the same first two numbers as the LeviLamina of your server. To see that one, run
lip listin the server folder; it shows a line such asgithub.com/LiteLDev/LeviLamina@26.60.3. Then write:luaadd_requires("levilamina 26.60.*", {configs = {target_type = get_config("target_type")}}) -
Change the copyright holder in
LICENSE, or replace the file with the license you want. The template itself is CC0, so you are free to choose.
You can also rename the namespace my_mod and the class MyMod in src\mod\. It is not needed for this tutorial.
4. Build the empty mod
Before you write any code, check that the template builds. In the repository folder, run:
xmake f -y -p windows -a x64 -m release
xmake
The first command configures the build for a server mod (the default; --target_type=client builds a client mod). The first time, it downloads LeviLamina and its dependencies, which takes several minutes. The second command compiles.
You should see build ok in the last line, and a folder bin\my-mod\ that holds my-mod.dll and manifest.json.
Downloads fail
xmake downloads packages from GitHub. If your network cannot reach it, configure a GitHub mirror or an HTTP proxy for xmake, then run both commands again. Run xmake repo -u to refresh the package list if xmake cannot find the LeviLamina version you pinned.
5. Add a log line and a command
A mod has three moments that LeviLamina calls in order: load(), enable() and disable(). Do only game-independent work in load(), such as reading a config file: the game is not ready yet. Register commands and listen to events from enable() on.
Commands are registered when the game asks for them, which is the ServerCommandRegisterEvent. Replace the contents of src\mod\MyMod.cpp with:
#include "mod/MyMod.h"

#include "ll/api/command/CommandHandle.h"
#include "ll/api/command/CommandRegistrar.h"
#include "ll/api/event/EventBus.h"
#include "ll/api/event/command/ServerCommandRegisterEvent.h"
#include "ll/api/mod/RegisterHelper.h"
#include "mc/server/commands/CommandOrigin.h"
#include "mc/server/commands/CommandOutput.h"
#include "mc/server/commands/CommandPermissionLevel.h"
#include "mc/world/actor/player/Player.h"

namespace my_mod {

MyMod& MyMod::getInstance() {
    static MyMod instance;
    return instance;
}

bool MyMod::load() {
    getSelf().getLogger().debug("Loading...");
    return true;
}

bool MyMod::enable() {
    getSelf().getLogger().info("Hello from my first mod!");

    using namespace ll::event;
    EventBus::getInstance().emplaceListener<ServerCommandRegisterEvent>([](ServerCommandRegisterEvent&) {
        auto& command = ll::command::CommandRegistrar::getInstance(false) // false: a server command
                            .getOrCreateCommand("hello", "Says hello.", CommandPermissionLevel::Any);
        command.overload().execute([](CommandOrigin const& origin, CommandOutput& output) {
            auto* entity = origin.getEntity();
            if (entity == nullptr || !entity->isPlayer()) {
                output.success("Hello, console!"); // run from the console or a command block
                return;
            }
            auto* player = static_cast<Player*>(entity); // safe: isPlayer() was checked
            output.success("Hello, {}!", player->getRealName());
        });
    });
    return true;
}

bool MyMod::disable() {
    getSelf().getLogger().debug("Disabling...");
    return true;
}

} // namespace my_mod

LL_REGISTER_MOD(my_mod::MyMod, my_mod::MyMod::getInstance());
What the code does:
getLogger().info(...)writes a line to the server console, tagged with the name of your mod.emplaceListenersubscribes to an event. LeviLamina removes the listener by itself when the mod is disabled.getOrCreateCommandcreates/hello;CommandPermissionLevel::Anylets every player run it (GameDirectorswould limit it to operators).overload().execute(...)adds the form/hellowithout arguments and the code that runs for it.
Game types have no RTTI
Minecraft is built without run-time type information, so dynamic_cast does not work on its classes. Check the type first, as isPlayer() does here, and use static_cast.
Build again with xmake. You should see build ok again.
6. Load the mod on your server
-
Stop the server if it runs.
-
Copy the folder
bin\my-modinto the foldermodsof the server, so that you getD:\servers\survival\mods\my-mod\my-mod.dll:powershellCopy-Item -Recurse -Force bin\my-mod D:\servers\survival\mods\ -
Start the server, as in Your first server or with
lip runin its folder. -
You should see a line with
[my-mod]andHello from my first mod!in the output, after the lines in which LeviLamina loads the mods. -
Type
helloin the input line of the server (console commands have no/). You should seeHello, console!. -
Join the server from Minecraft (address
127.0.0.1, port19132) and type/helloin the chat. You should seeHello, <your name>!.
After each change: stop the server, run xmake, copy the folder again, start the server.
Error codes when the mod does not load
If LeviLamina reports an error such as 126 or 127 instead of loading my-mod, the mod was usually built against another LeviLamina version than the server's. Check the pin of step 3. LeviLamina troubleshooting explains the codes.
What you have now
- A Git repository with your mod, which builds with
xmake. - A mod that logs a line and registers a command, loaded by your server.
lip.tomland a release workflow in.github\workflows\, ready for publishing.
Next steps
- Let others install your mod with one command: Publish your mod with lip.
- A larger example with config files, a database, a form and items: ShrBox/ExampleMod.
- Commands with arguments: Command guide.
- React to what players do: Event guide.
- Ask players with dialogs: Form guide.
- Change how the game behaves: Hook guide.
- Every class and function: LeviLamina API.
- Questions developers often ask: Developer FAQ.
- Prefer a script language: Your first script plugin.